
How to Install OData Modeler in SAPUI5 Step by Step Guide
Enterprise application development requires speed, accuracy, and clean service architecture. Developers working in the SAP ecosystem depend on visual tools to simplify complex tasks. OData Modeler is one such powerful tool that streamlines OData service design. It allows developers to create service models using a graphical interface instead of manual coding. This approach saves time and reduces technical errors. If you are building applications with SAPUI5 or designing enterprise apps aligned with SAP Fiori standards, installing OData Modeler is an essential first step. This guide explains the complete installation process with practical instructions and helpful tips.
What Is OData Modeler and Why It Matters
OData Modeler is a graphical editor used to design OData services visually. It simplifies metadata creation and entity relationship modeling. Developers define entities, properties, and associations without writing XML manually. As a result, development becomes faster and more reliable. Teams working on enterprise dashboards benefit from this visual approach. The tool integrates seamlessly within the Eclipse IDE environment. Developers continue working in a familiar workspace. Visual modeling also improves collaboration between frontend and backend teams. Clear service structures reduce misunderstandings and rework.
Prerequisites Before Installation
Verify system requirements before starting the installation. Eclipse must already be installed on your system. OData Modeler works as an Eclipse plugin. Java must also be installed and configured correctly. Most SAP development tools depend on Java runtime. Next, confirm your Eclipse version carefully. Repository links differ based on Eclipse releases. Using an incorrect version causes installation failure. A stable internet connection is necessary. The installer downloads required components from online repositories.
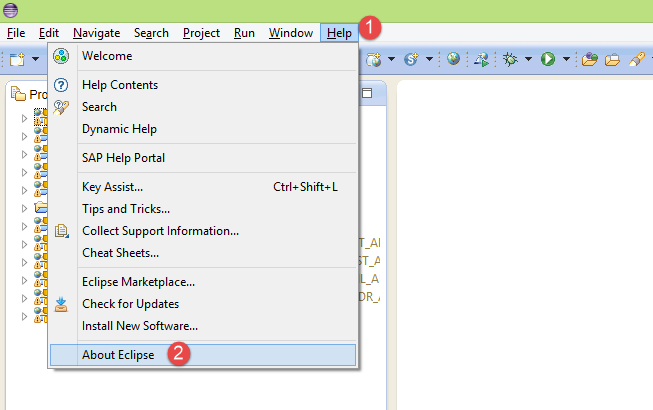
Step 1 Open Eclipse Install Software Window
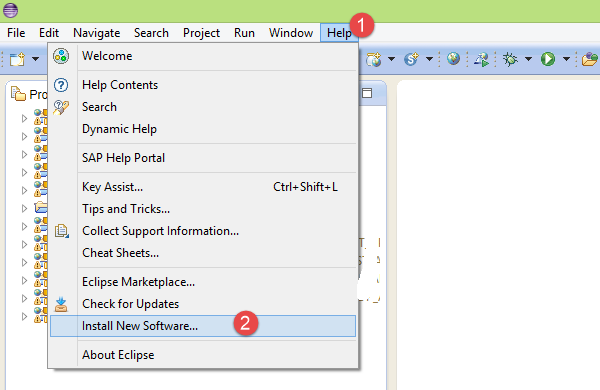
Launch the Eclipse IDE and wait until the workspace loads completely. Navigate to the top menu bar and click Help. Select Install New Software from the dropdown options. This opens the software installation manager window. The manager allows you to add repositories and install plugins easily.
Step 2 Add SAP Repository URL

Locate the Work With input field in the installation window. Enter the repository URL according to your Eclipse version. If you use the Kepler version, enter http tools hana ondemand com kepler. If you use the Juno version, replace Kepler with Juno in the link. Press Enter after pasting the URL. Eclipse connects to the repository and fetches available packages. This process may take a few moments. The available software list appears below. Expand categories carefully to find relevant tools. Avoid selecting unnecessary components.
Step 3 Select OData Modeler Plugin
From the list of software, expand SAP Mobile Platform Tools. Inside this section, locate the OData Modeler option. Tick the checkbox beside OData Modeler. Double check your selection before proceeding. Installing extra tools increases setup time and affects performance. After confirming the selection, click Next to continue.
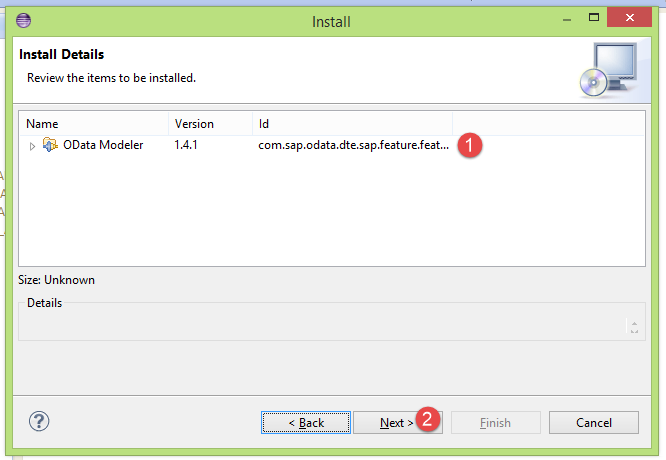
Step 4 Confirm Installation Details
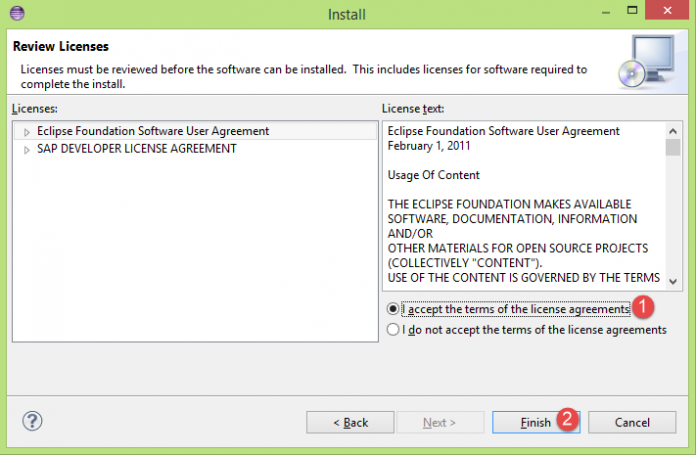
The installation details screen displays selected components. Verify that OData Modeler appears in the list. If it is missing, go back and reselect it. Accuracy here prevents incomplete installations. Click Next once verification is complete. You will now see license agreements. Read the terms carefully before proceeding. Select the option that indicates license acceptance. This step is mandatory for installation. Click Finish to begin the installation process.
Step 5 Complete Installation and Restart Eclipse
The installation begins immediately after confirmation. A progress indicator appears in the status bar. Large downloads may take several minutes. Do not close Eclipse during installation. Interruptions may corrupt plugin files. Security prompts may appear during installation. Click Install Anyway if prompted. These warnings are common for external plugins. Once installation finishes, Eclipse requests a restart. Click Yes to restart the IDE. Restarting ensures all changes take effect properly.
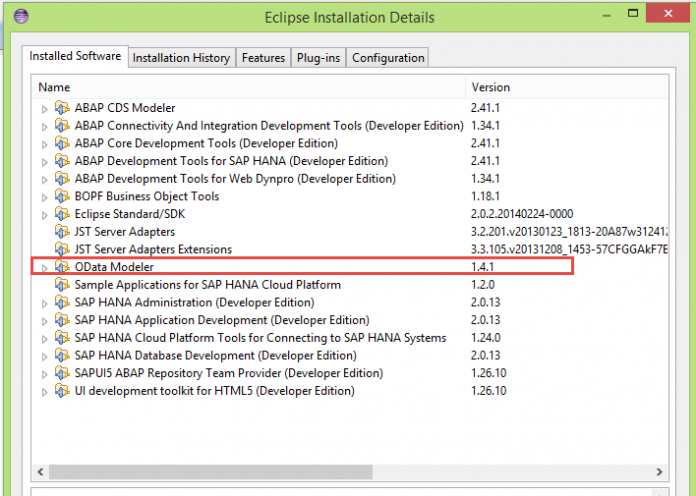
Step 6 Verify OData Modeler Installation
After Eclipse restarts, confirm that installation completed successfully. Click Help from the menu bar again. Select About Eclipse from the dropdown list. A new dialog box appears showing platform details. Click Installation Details to proceed. Switch to the Installed Software tab in the window. Scroll through the list of installed plugins. Look for OData Modeler in the entries. Its presence confirms a successful installation. If it does not appear, repeat the installation process carefully.
Common Installation Issues and Quick Fixes
Sometimes the repository link fails to load due to network restrictions. Corporate firewalls often block external repositories. Switching to another network usually solves this problem. Contact your system administrator if access remains blocked. Version mismatch is another common issue. Always use a repository link that matches your Eclipse version. Incompatible versions prevent plugin installation. Java configuration problems also create errors. Updating Java to the latest stable version resolves most issues. Clearing Eclipse cache helps when installations freeze.
Practical Example After Installation
After successful installation, you can start modeling OData services immediately. For example, consider a sales management application. Create entities such as Customer, Order, and Product visually. Define relationships between these entities using drag and drop tools. This approach eliminates manual metadata coding. Once modeling is complete, generate service artifacts automatically. These artifacts connect easily with SAPUI5 applications. Frontend developers consume services without backend confusion. Development cycles become faster and smoother.
Best Practices for Efficient SAP Development
Keep Eclipse updated to maintain compatibility with SAP plugins. Updated versions reduce performance issues and plugin conflicts. Use dedicated workspaces for SAP projects. Organized environments improve productivity significantly. Install only necessary plugins to keep Eclipse lightweight. Too many plugins slow down performance. Regular workspace backups prevent accidental data loss. Version control systems help manage service model changes efficiently. Proper documentation improves team collaboration and long term maintenance.
Benefits of Using OData Modeler
Visual modeling reduces human errors in service definitions. Developers understand system architecture instantly. Complex relationships become easier to manage. Maintenance becomes simpler over time. Productivity increases because modeling is faster than manual coding. Teams deliver enterprise solutions quicker. Consistent service design improves application stability. Businesses benefit from scalable and maintainable architecture.
Next Steps in SAPUI5 and Fiori Development
After installation, start by creating a simple OData project. Practice building entity types and associations. Gradually explore advanced modeling features. Integrate your services into SAPUI5 applications. Build responsive enterprise interfaces aligned with Fiori design standards. Continuous practice enhances development speed and quality. Staying updated with SAP ecosystem updates keeps your skills relevant.
Conclusion
Installing OData Modeler is a straightforward process when done correctly. Proper setup ensures efficient SAP development workflows. Visual service modeling saves time and reduces complexity. Developers focus more on building powerful enterprise applications. With the right tools in place, SAPUI5 development becomes faster and more productive.
YOU MAY BE INTERESTED IN
ABAP Evolution: From Monolithic Masterpieces to Agile Architects
A to Z of OLE Excel in ABAP 7.4


