

The SAP Workflow Builder shows all activity steps in a clear, graphical view. It integrates everything from start to finish in one central tool. This tool helps create, display, change, and test any workflows.
Users access the Workflow Builder using transaction SWDD.
To open Workflow Builder, follow these steps:
- Go to the menu.
- Click on Tools.
- Select Business Workflow.
- Choose Development.
- Click on Definition Tools.
- Finally, select Workflow Builder.
The figure below shows the Workflow Builder. It includes the navigation and workflow components needed to create a workflow.
The Workflow Builder has different sections that help you navigate through the flow and also create the components to build the workflow. The following describes and illustrates the different sections of Workflow Builder.
Information Area
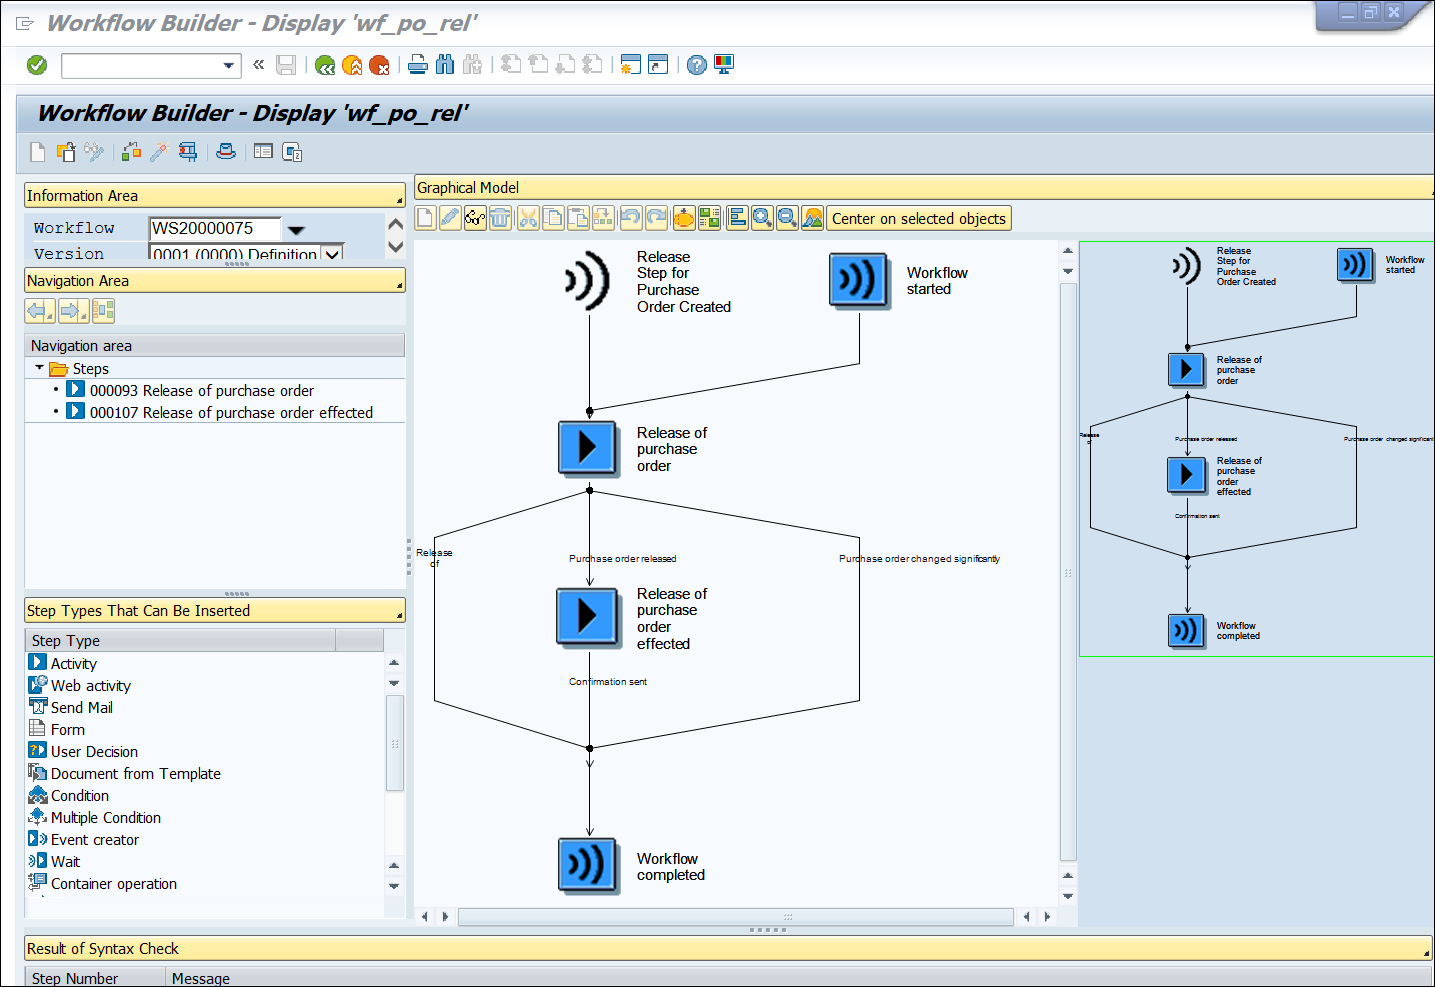
This area contains the workflow number and version of the workflow. The active version loads as soon as you open Workflow Creator or Workflow Builder. You can also choose to view the previous version. The workflow follows the execution path as the active workflow when it is triggered. The system started a workflow on November 1, 2023. The current version is 000. The workflow will start the activity flow per the active version (000). The developer added a few more steps to the workflow. Now, there is a new version called 001. So, the new active version will be 001. Any new workflow triggered will follow the 001 process flow steps. But the workflow triggered on November 1, 2023, will follow the 000 version. Check the earlier version of the workflow to troubleshoot old active workflows. The next figure shows the Information Area. You usually find it in the top-left corner of the Workflow Builder screen.
4
Navigation Area
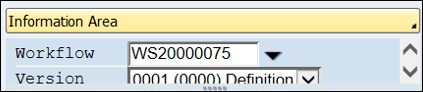
This section shows all the steps in the workflow. You can go to the details of the steps by clicking Steps in this section. The workflow diagram can be complex. Navigating to a specific step may take time. This area helps with quick navigation. Use a clear and simple step name. This makes it easier to find the right step. A number is associated with each step and is available in the technical log of the workflow. This will link a workflow log step to its details view in the workflow definition. Below are the two steps of workflow WS20000075 in our example.
Step Types That Can Be Inserted
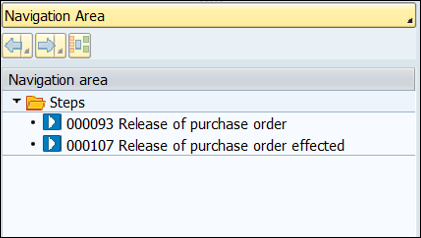
Workflow Builder shows Step Type by default when you open it. It displays all the possible step types that the user can insert into the workflow. You can drag and drop any step to add it to your workflow. You’ll get a plus (+) sign in the workflow graphical area where the step can be added. Double-click any step in the workflow area to add a new step. This new step will appear right after the one you selected. The figure below shows the possible step types that can be added to the workflow
This section can display other information besides step type. Click the button above to see more information options for this section. You can switch to the view you want to display in this section depending on your needs. Here are the options that will show up when you click the gray button below the navigation area.
Workflow Container
The workflow container stores all the data elements defined within the workflow instance. This is similar to the data variable you define for any development. There are some container elements created automatically when a workflow is created (e.g., business objects), but there are also some custom workflow containers that are needed to pass the information from multiple steps. Workflow container elements are used to pass information from the main workflow instance to different steps. It’s also used for dynamic content of any description and text.
My Workflows and Tasks
This list shows all the workflows you’ve created/changed.
Document Templates
There is a step type called document form templates. All the workflow document templates that can be used for the document form template step are shown here.
Workflow Wizard
If you want to create workflows using a wizard, you can try out this section. All possible standard workflow wizards are available here.
Teamworking
If multiple people are working on the same workflow, you can find out who has changed any step. You can find out those steps in the workflow with different search criteria such as last changed by, created by, and so on.
Workflows of this Definition (Outcome)
All the current running in-process workflows for this workflow definition are shown in this section.
Note it!
You can create notes and documents about this workflow in this section.
Message Area
The bottom of the screen shows error, warning, and info messages when you activate or check the workflow’s syntax.
Overview
The rightmost part of the pane shows the entire workflow in one pane. You can zoom in this section. The zoomed area will show up in the Graphical Model section. You’ll find a green rectangular box highlighting the zoom area. This will help you zoom in on a part of the workflow. It’s useful when there are many tasks, making it complex and hard to read in one view. You can zoom in on the section you need. Then, you can explore details from the Graphical Model view.
Graphical Model
The middle part of the screen shows the graphical workflow, including a zoomed view. This section is used for further detailed navigation into tasks and other activities.
Design the workflow activity flow first. Then, create the building blocks in the Workflow Builder.
YOU MAY BE INTERESTED IN
A Comprehensive Guide to SAP ABAP Training Online
Bridging the Gap: Integrating ABAP with Other Cloud Services
Core Data Services in ABAP for HANA
Error: Contact form not found.


